Topic outline
-
Welcome to the Course on Multimedia in Moodle.
This course is designed to teach you about embedding media on the VLE.
By the end of the course you should be able to:
- Insert and resize images.
- Embed MP3s in line in a course.
- Link to the "Big Player" for MP3s.
- Embed Youtube videos in a course.
- Embed Slideshow's from Google docs
More may be added to this course at a later date, but this should get people started on using multimedia in moodle.
This course assumes knowledge of the simplier functions of Moodle, if you aren't confident using Moodle generally we'd reccomend you complete the "Introduction to Moodle" course first.
Other Training courses can be found in the Training Category - Insert and resize images.
-
Adding & resizing images in Moodle
Images are very useful in moodle courses, for sign posting different types of lesson content, showing examples of work, and generally breaking up what would otherwise be a block of text.
Assuming that you have downloaded or saved the image on your area these steps will guide you through adding it to your course.
Open the course and click edit, then click the image window to link to an image.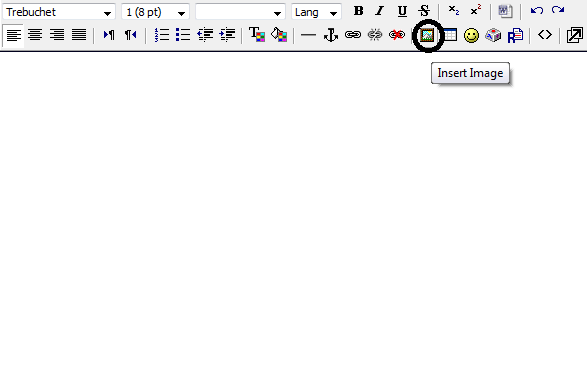
This will open up the file manager to be used.
Click on Browse (1) then click on your file, which will be in the main window (2). Click Open (3) then click the upload button (4).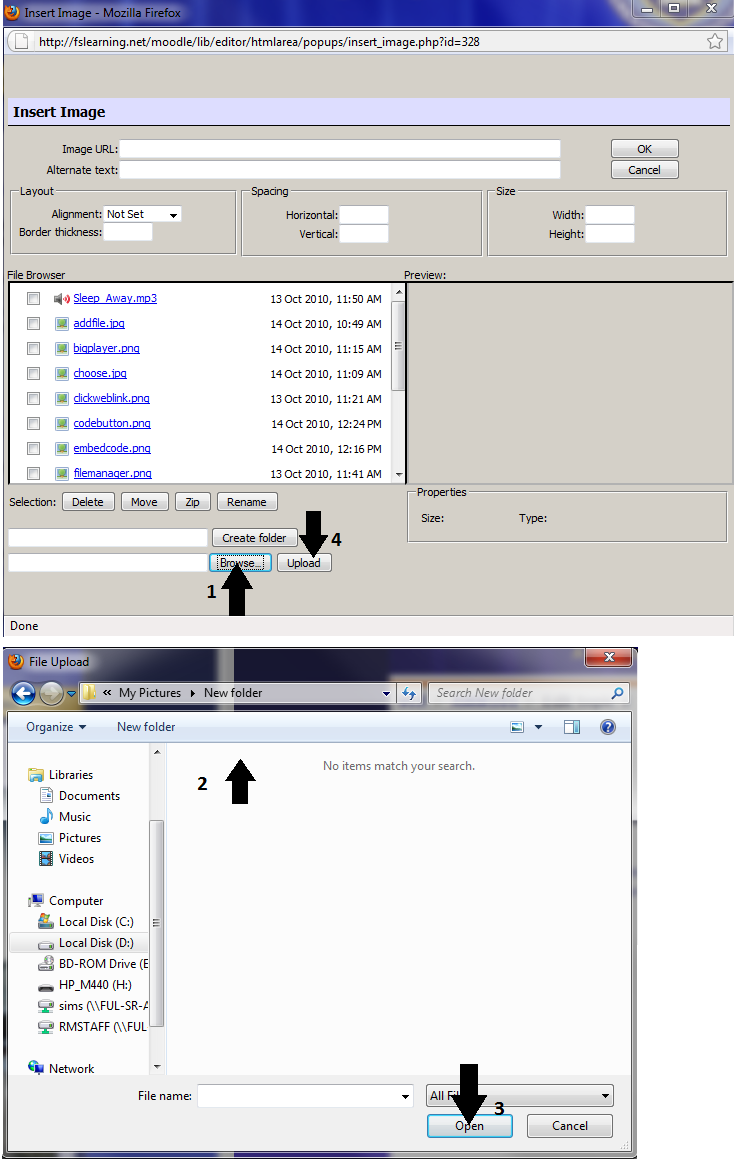
Click on the blue name of the file (1), you will need to type in some alternate text (2) this will display in case the image doesn't show. Click okay to insert the image and return to the course (3). The image will also be previewed at the right hand side (4) which can be useful if you can't remember which file you need.
If you've followed these steps you'll get an image, like the smile below:

Resizing Images
It can often be helpful to resize images once they've been put in. This can make it easier to use in a course and make it easier to show multiple images.
In this instance we'll assume that you've managed to insert a picture using the instructions above. Once you've put an image in, go into the editor and click on the image, then click the "Insert image" button, as you did to insert it in the first place.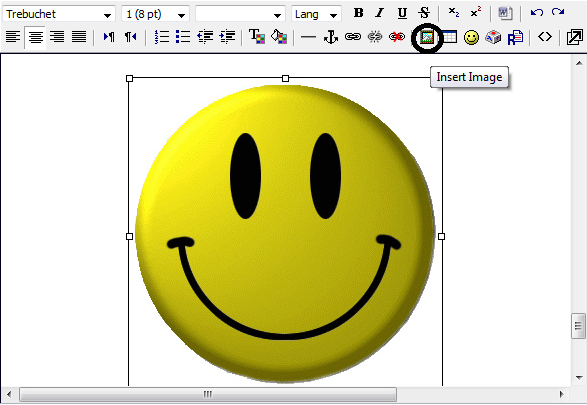
This will open up the file management window that you've used before to add images. However in this case the images details are already filled in for you. The section to look for is the dimensions of the image. Simply replace these with your desired values and you can make a smaller (or larger) image.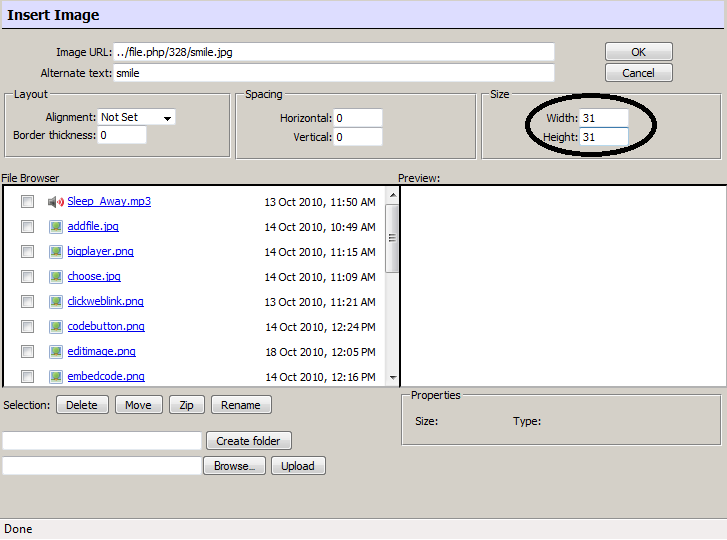
This would leave you with a smaller image like this:
The link below will show you some example pixel sizes so you have something to compare it to when you're resizing images.
-
Using MP3s in Moodle
This topic is on embedding MP3 files like this
This is very useful in lessons and can be a great aid in subjects where multimedia can aid in demonstrations.
It can also be used to help users that may have reading difficulties by speaking any written instructions.
This course assumes that you have your MP3 ready and saved in your area, if you don't then please contact IT for support in getting to this stage.
To begin with you want to insert a file link.
Turn on editing and edit the seciton you wish to play the MP3 in.
Type in some text (Like "Listen to this:") Highlight it by dragging over it with the mouse, then click the "Link Button" at the top. Please see this screen shot:
This opens the link page, click browse to go to the file page.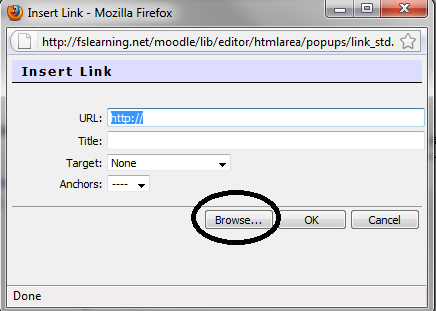
This in turn brings up the file manager page. Use this to upload the file from your PC.
To begin the process click the browse button at the bottom, this brings up the file selection window, you can then pick the file on your PC and hit "Open" Then click on the upload button on the first window.
I know this sounds complex, on the screenshot I've highlighted what you need to click, and numbered them in the order you need to click them.
Both windows are shown in this screenshot: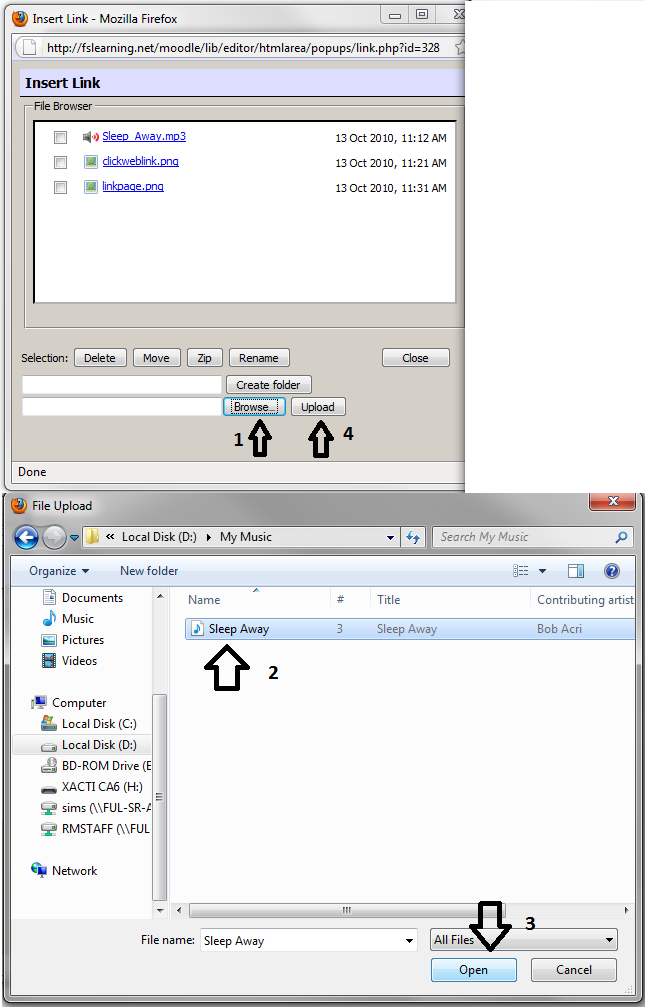
Click the file name (In blue) of the file that you want, **Don't click the box, click the actual file**
This then inserts it in the "Link" window we started from earlier. Just hit okay to finish the process.
In your editing window it will look something like this:
Listen to this:
And you may think that it hasn't worked, however this just tidy ups the editing window. Click Save changes at the bottom of your course, this will take you back to the course.
Then you'll be left with a lovely MP3 player just like this one:
-
Playing MP3s in the "Big Player"
Sometimes it's easier to use a player in a new window rather than a small one in-line. The key advantage of this is that it has it's own volume control.
This is commonly known as the "Big Player" and I'll explain how to make this work below.
The steps for uploading a MP3 file are the same as above, so you can follow the steps above.
Assuming you've uploaded the file aready I'll guide you though the process of adding it to use the "Big Player"
To make it show on its own page you need to add it to the bottom of the course as a resource.
Click "Add a Resource" then "Link to a file or website"
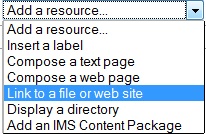
This takes you to a page to edit the settings. You need to type a title in at the top, then go down to the "Location" box. Underneath it click "Choose or upload a file..." to pick your file.

This will open up a file manager. In this example we've assumed you've already uploaded the file, so just click on choose next to your file to pick it. This has been circled in black for your convenience. If you wished to upload a new file please click the upload button (circled in blue) to do this from this window.
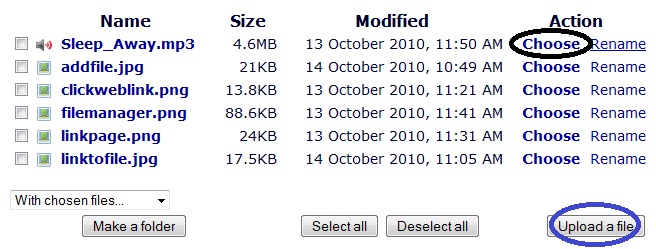
This takes you back to the "Link to a file" page we were on a moment ago. Please scroll down and click "Save and return to course". If you've done this correctly you'll be left with a link just like the one below this text taking you to the window with the "Big Player".
-
Embedding Youtube videos
Embedding a youtube video to display on a page can be very useful. Often resourses have been uploaded to You Tube and these can be useful in teaching.
Whilst in school, teachers Log ins will display You Tube, but students wont be able to view it from their accounts. However at home obviously students will be able to view videos. These should generally be used for demonstrating things from the front.
We'll show you how to add a video already on You Tube, uploading one will be covered separately.
First go to You Tube and find the video that you want using the search function, you then want to click the embed button circled below.
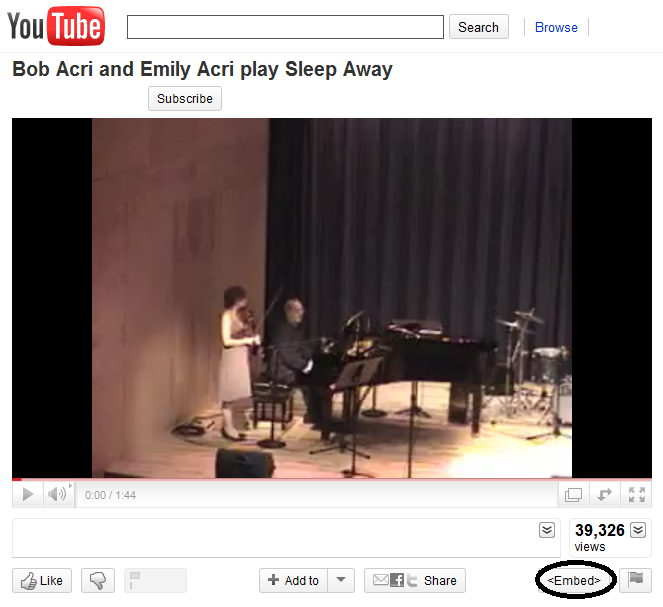
This will open up a small window below where you can edit the settings for the You Tube video that you'll use on the VLE. Settings include colour of borders, size and related videos display. For school you I'd reccomend turning off the "Related Videos" as you have no control of these and hence can't police if they are inappropriate.
Once you've made the changes click in the box with code (highlighted below) and press CTRL and A on your keyboard, this will highlight this in blue as in the picture below.
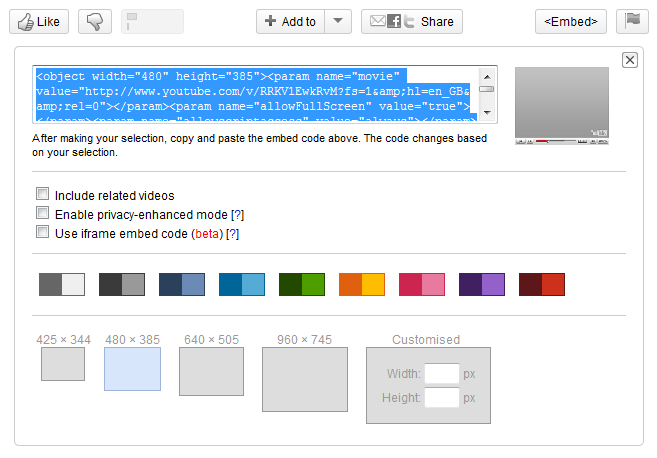
Pres CTRL and C on your keyboard to copy this onto your clipboard to put into the VLE.
Go to the course on the VLE that you wish to insert the video to.
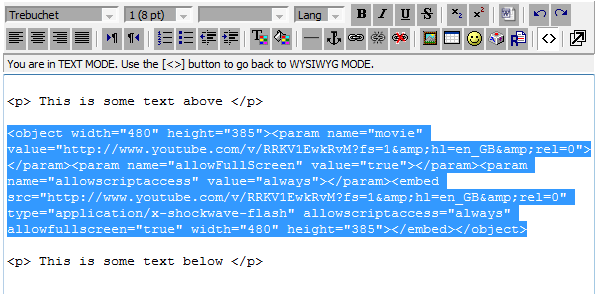
Turn editing on, and edit the topic. As in the example below please ensure that you have some text both above the the area you wish to insert the You Tube video. This ensures that if you later want to add more text either side of it you won't accidentally delete some of the code.
Once you're ready, in the editor click the code button, circled below.

This will turn of the editor and show you the raw code. Be careful when you're editing this code, if you get unsure please come to IT for some support and we can assist you doing it.
Most of your text will be surrounded by <p> tags this denotes a Paragraph and should be expected. Hit the Enter key to give yourself a couple of lines space between the above and below text to give yourself some space to work in.
Click on this space, then press CTRL and V to paste the code in that you copied from the You Tube. Hit Save Changes to go back to your course.
This will embed the You Tube video like below.
If you need help putting videos on You Tube in the first place please contact IT.
-
Embedding a slideshow from Google Docs
This topic will teach you how to embed slideshows from Google Docs. This can be useful for showing presentations within Moodle, rather than making the users download them.
Go to http://docs.google.com to log in to Google Docs. It's a free to use service that you can sign up for if you don't already have an account.
When you log in you'll see the below screen, click on upload to load your file.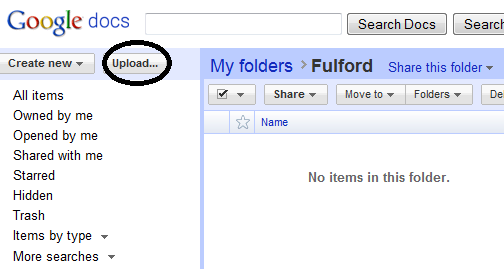
This will open the upload window where you can pick the file you want to upload.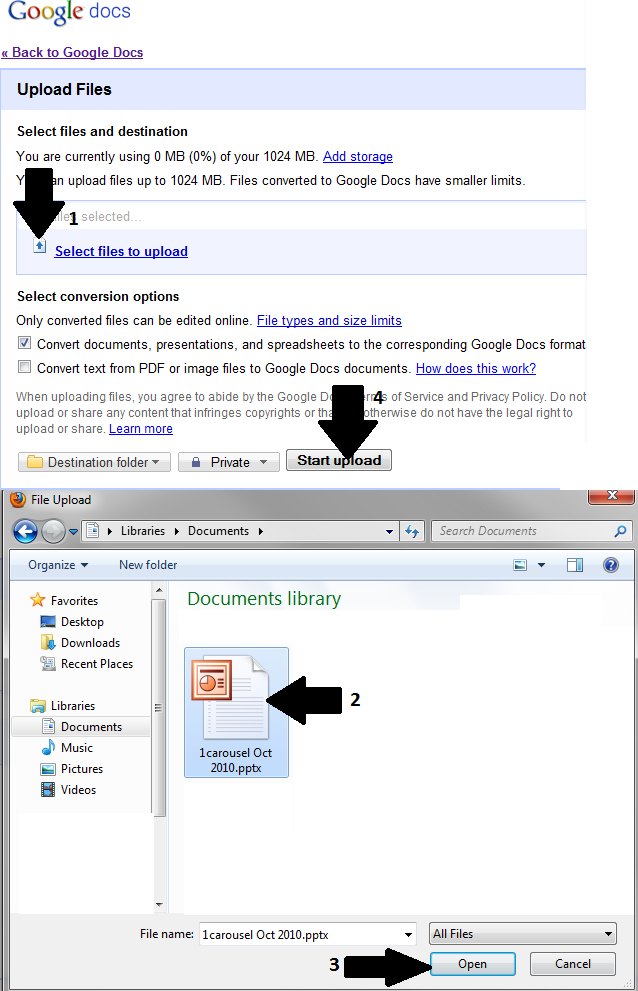
Click "back to google docs..." to go back, then you'll be back on the first screen ready to convert your file.
Click on the file once to view a preview of it, you can then check that it is displaying correctly. Clicking on the arrow next to "Share" brings up the menu, you can then click "Publish/Embed" to get the settings to embed your file.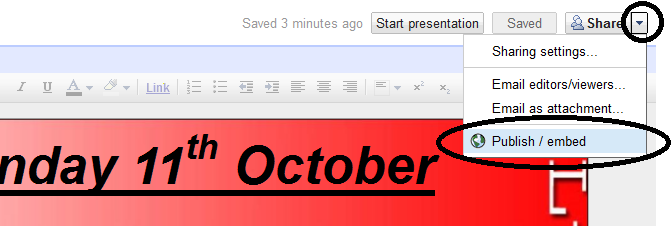
Click the first button to toggle publishing, (when clicked it should now say "Stop Publishing" as it does below.
You then want to copy the code in the below box. Highlight it by dragging across the box, then press CTRL + C to copy the text.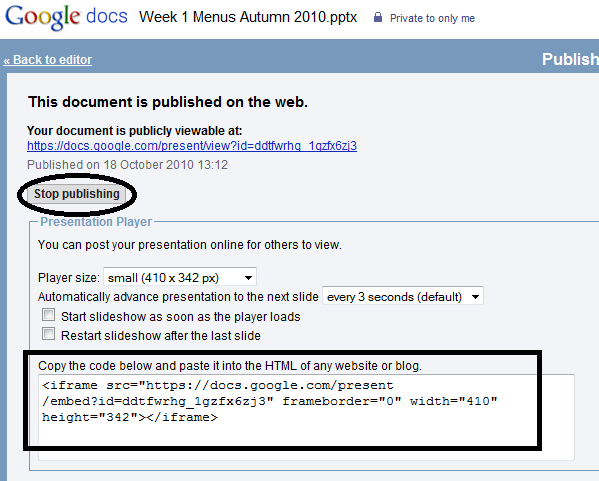
Go to the course on the VLE that you wish to insert the slideshow to.Turn editing on, and edit the topic. As in the example below please ensure that you have some text both above the the area you wish to insert the slideshow to. This ensures that if you later want to add more text either side of it you won't accidentally delete some of the code.
Once you're ready, in the editor click the code button, circled below.

This will turn of the editor and show you the raw code. Be careful when you're editing this code, if you get unsure please come to IT for some support and we can assist you doing it.
Most of your text will be surrounded by <p> tags this denotes a Paragraph and should be expected. Hit the Enter key to give yourself a couple of lines space between the above and below text to give yourself some space to work in.
Click on this space, then press CTRL and V to paste the code in that you copied from google docs. Hit Save Changes to go back to your course.
This will insert the slideshow into your course, like this:
