Topic outline
-
Welcome to the
Introduction to Moodle.
This course is designed to teach you about how to use Moodle, the software that runs the VLE. We encourage staff to refer to the system as "The VLE" to keep things clear, particularly for new staff and students. The software that it runs on is called Moodle, hence why this is often mentioned in the courses.
By the end of the course you will have learnt about:
- Logging on to the VLE and Solving login problems
- Navigating around Courses
- Creating a course
- Basic Editing of a course and Adding Links
- More advanced editing
Other Training courses can be found in the Training Category - Logging on to the VLE and Solving login problems
-
Logging on to the VLE
In this section we'll look at how to log on to the VLE and what to do if you have problems. Click here to go directly to the problems section.
The VLE has been set up to use the same details you use on the main school network.
In the log in box on the main page of the VLE type in the username and password that you set up to use on the main school network.
When you're logged on look above the logo, it should say you are logged in as "Your name". The log out link is next to it.
Return to Top
Problems with logging on
There is a chance when you try to login that it may not work.
The first thing to check is that the password hasn't been mistyped or that the CAPS key is on on your PC. This is a very common cause of problems logging on to the system.
If not it may be that you have gotton your password wrong, if this is the case please come to the IT Networks Department in B Block and we will reset it for you. -
Navigating around courses
This section will give advice on navigating around courses on the VLE. When you first log in it may seem confusing but the main focus should be the two large buttons in the middle. These seperate the majority of courses into Curriculum and Support sections, within these these are seperated into the various departments.
In this case, we're going to look at a course for people studying IT in year 7. So click on IT in the subject list, then KS3. This will give a list of the courses in the subject.
This will give you a list of the courses in this sub category. Click on the name of one to enter the course. If you have access you will then be free to navigate around the course, participating and clicking on links as needed.
Course Seletion: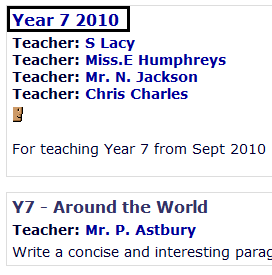
Sample Course: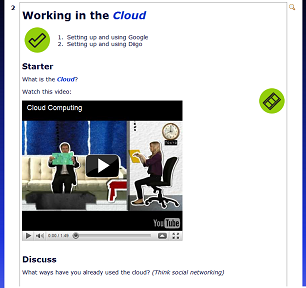
-
Creating a Course
This section will show you how to create a new course. This will assume you have permission to do so, if you do not and need permission please contact IT.
To begin with you need to navigate to where you'd like to create the course. For this example we'll create another course in IT under KS3.
Then go to the bottom of the section and click "Add a new course".
You then get to the "New course" screen, you need to fill in the parts with the large asterisk. Although this is more than the VLE sets as obligitary, filling in all these fields means that you will have met best practice rather than the minimum.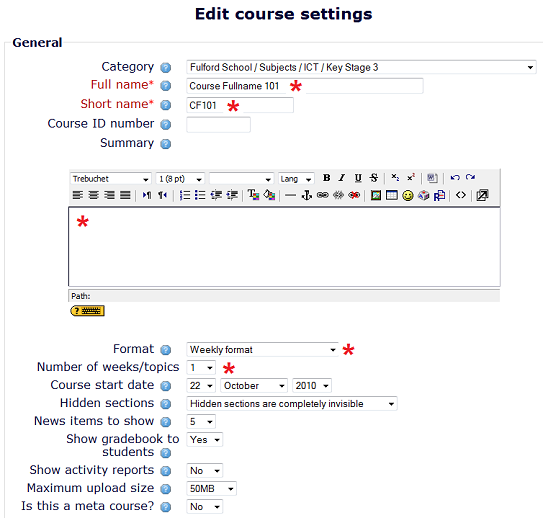
For the Course name please put an informative name. Best practice is to include the year group, the subject and the year created. This means we can keep things sorted and know if a course is out of date.
E.G. - Year 11, World War two, 2010. < This would be a good title
Mr. T's new course < This would be a bad title, we don't know who this is for or what it contains.
You also need to input a shortname, its usually good to abbreviate the title. so in the above example 11WW210 would be a good abbreviation.
In the summary put in some information on what the course will contain, a few lines is appropriate.
To continue our example: "This course has information on the Politics behind world war two for year 11 students in preperation for their GCSE's"
The only other section to worry about is the type of course, weekly format is sorted by date, topics is just by numbered topics, just below you can change the number of weeks or topics.
Scroll to the bottom and click "Save Changes". It then takes you to a window where you can edit permissions, but you shouldn't need to do this. Just "click here to enter your course" to go to it.
Your Course is now sucessfully created.
-
Basic Editing of Courses
To begin editing, go to a course that you have permission to edit. You need to click "Turn Editing on" in the top right of the course.
This changes the view you get to be one that shows all the editing options. The small blue edit button is one you'll use extensively, it looks like this:
This opens up the edit window for the topic. This is common to the various areas of the VLE and so once you're used to it you'll be able to edit anything.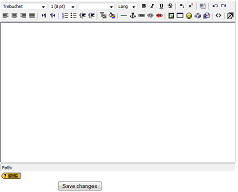
At the top of the window is the toolbar, I'll go through a few of the common buttons below so that you have an understanding of them. The buttons are similar to those used in common Office programs, so they should be familiar.
1. The buttons highlighted by 1 control alignment. This can center your text to the left, center or right, or even justify it like in newspapers.
2. This drop down box controls the size of your text.
3. This button makes the text Bold
4. This button makes the text Italic
5. This button makes the text Underlined
6. These buttons can make the text autonumbered (like this section) or bullet pointed.
7. This button changes the text colour.
8. This button lets you add a link, insert the link into the pop up box and it will be added. More info will be given below.
9. This button adds images, more information can be found in the Multimedia Course
10. This button gives you a menu when you can add smilies:

Adding Links
This section will teach you how to use the link button.
Identified by number 8 above, this small chain lets you add a link to a webpage within the text.
Start by highlighting the text you wish to link to, by dragging over it with your mouse. Then click the link button.
This will open up the below pop up for you to fill in the details. Type in the link name, in this case Google.co.uk, then choose the target. "None" will mean it will open in the same window, whereas "New" will open a new window or tab and leave the existing one as it is. Click okay to insert the link.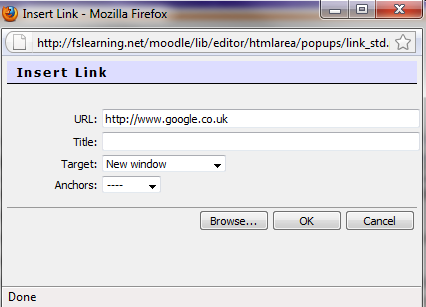
This gives you a link like this:
Google.co.uk -
Advanced Editing of courses
This section will show you to do some of the more advanced features on the VLE. There are even more advanced features but we'll cover them in another course.
In this section you will learn about:
Labels
Labels are a very useful feature of the VLE. They can be used to produce small amounts of text, and use the same editor as the main content section. This means you can even insert links or pictures into them. The "Return to Top" links throughout this course have all been done with labels.
With editing switched on in a course, pick the topic you wish to add a label to. Click on the "Add a resource" drop down box and select "Insert a label" as below.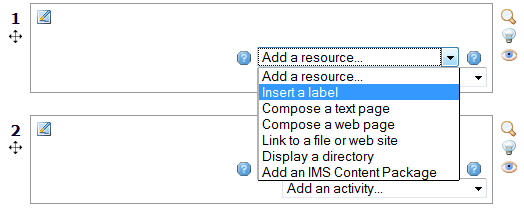
This will take you to the label editing screen.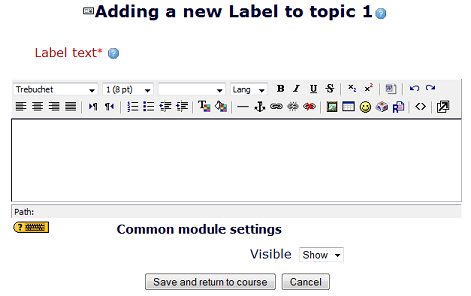
This allows you to choose what you want to have in your label, as you can see it is the same as the editing window you've used to edit courses before. Type in whatever text you like, including links and pictures and hit save.
As you can see below, this course has a summary, and 3 labels (one of which is hidden) to a user viewing the course they all look the same and can be used to show a variety of material. The hidden label in grey only shows to people with Editing permission on the course (like teachers).
The "Visible" Drop down box can let you automatically hide the label, we'll deal with hiding in the next section.
Return to Top
Hiding
You've just seen an example in "Labels" how things can be hidden to be used in courses. Hidden lables are usually used by teachers to give teaching notes and prompts. They show in light grey and can only be seen by teachers and administrators.
As well as labels you can also hide anything else you've added to the course. You can hide whole topics, resources like documents and links, and other activities.
There is an icon that shows whether they are visible or hidden. This is a small Eye, when its open, the item is visible, when it's closed the item is hidden.
You can click this next to a resourse or topic, as a teacher it will get "Greyed out" as a student it will be invisible.
Some labels and resources have been hidden below:
Teachers see this: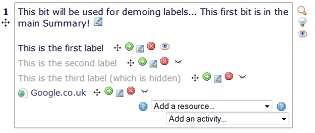
Students see this:
You can also hide entire topics:
Teachers see: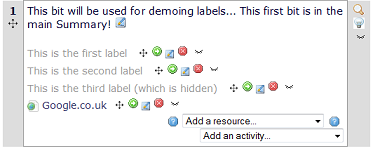
Students see:
As you can see, for students it isn't even greyed out, it's missing completely.
Selective use of this can let you just display one topic at a time to students, or show them homework questions and reveal the answers the next week.
Return to Top
Moving
Often if you are working with a lot of resources or topics you may find it useful to rearrange them.
Simply Click and drag the move icon next to an item, two of them have been highlighted below. As you are dragging a grey box (on the below image) will show you roughly where your item will display if you release the mouse, release it to drop it in position, and the course is automatically saved.
Return to Top
Adding Links as resources
Much like you've seen at the bottom of each of these course sections, adding links as resources can be useful. On this course we've used them to add "Return to Top" Links it, to make it easier to navigate the course. Often departments wish to add a link to a useful website. In this example we'll use www.google.co.uk
When editing click "Add a resource" and then "Link to a file or web site"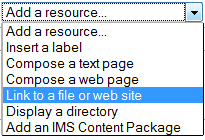
This will take you to the link page, type in a name for your link, then it's location (or web address) it can be easier to copy and paste into this section. Scroll down and click "save and return to course" to view the completed link.
This leaves you with a lovely web link, as below:
Return to Top
Adding Documents as resources
To add a document as a resource, follow the steps above to get to the "Link to a file or website" Then click the "Choose or Upload a file" button underneath.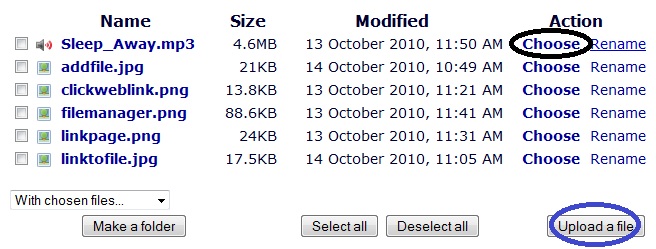
If you've already uploaded the first click "Choose" (In black) if not then click "Upload" (in blue).
The upload file box opens, click browse to find your document on your computer and press open. Once you've opened the file, click upload this file and this will take you back to the file window where you can "Choose" as above.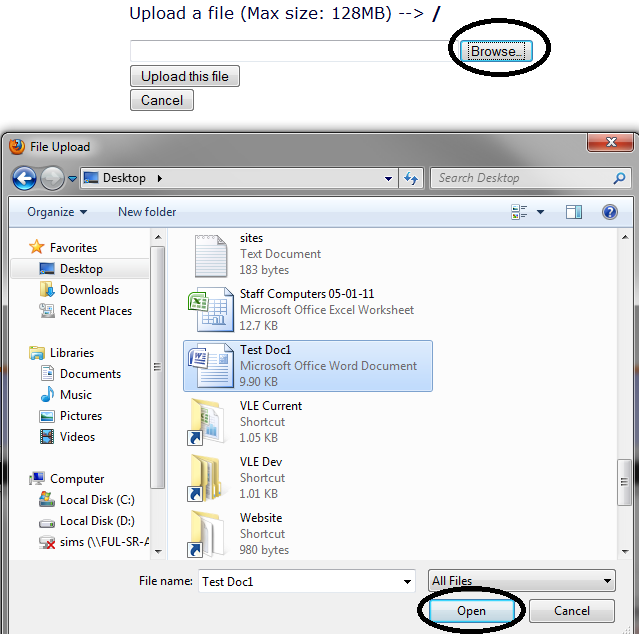
Then scroll down and type, "Save and return to course", and you'll be left with a file like this: